Getting Started with Tiling WM [Part 1] - I3
Table of contents
Disclaimer
I love customizing desktop. I make changes in my desktop everyday, make it look eye candy. My colleagues ask me how to make their desktop look like mine. But there are many steps and things to learn and follow, I know because I’ve gone throught it. Therefore I decide to write this getting-started guide to give people a shortest path to Fancy world.
Overview Window Manager
First of all, you have to know the basic concepts.
Desktop Environment vs. Window Manager
We’ll begin by showing how the Linux graphical desktop is layered. There are basically 3 layers that can be included in the Linux desktop:
- X Window: All GUIs require an X Window System layer, which draws graphic elements on the display. Without the X server, neither a WM nor a DE could create images on a Linux display. X also creates a framework for moving windows and performing tasks using a mouse and keyboard.
- Window manager:
- A WM controls the placement and appearance of screen elements. Popular WMs: i3, awesome, dwm…
- Requires configuration to get what you want.
- Tends to be flexible and highly customizable.
- Customizes most aspects of a Linux experience.
- For Nerd: not user-friendly out of the box, need to edit configuration files…
- Desktop environment:
- A DE requires both X and a WM. It also adds the deeper and seemless integration with applications, panels, system menus, status applets, drag-and-drop functionality,… The most popular DEs: KDE Plasma, GNOME, Pantheon, Cinnamon,… Sounds familiar, right?
- Excellent default configurations.
- May not be particularly customizable.
- Gret if you don’t want to customize everything.
Types of Window Manager
- Stack window manager:
- A stack window manager renders the window one-by-one onto the screen at specific co-orinates. If one window’s area overlaps another, then the window “on top” overwites part of the other’s visible appearance. This results in the appearance familiar to many users in which windows act a little like pieces of paper on a desktop, which can be moved around and allowed to overlap.
- Openbox, Fluxbox, Enlightenment…
- Tiling window manager:
- A window manager with an organization of the screen into mutually non-overlapping frames (hence the name tiling), as opposed to the traditional approach of coordinate-based stacking of objects (windows) that tries to emulate the desk paradigm.
- Awesome,i3 (here we go), dwm, bspwm…
- Compositing window manager:
- A compositing window manager may appear to the user similar to a stacking window manager. However, the individual windows are first renders in individual buffers, and then theirs images are composited onto the screen buffer; this two-step process means that visual effects (such as shadows, translucency) can be applied.
- Mutter (GNOME), Xfwm (XFCE), Compiz (Unity), KWin (KDE)
Overview I3
- i3wm is a tiling window manager designed for X11.
- It supports tiling, stacking, and tabbing layouts, which it handles dynamically.
- Configuration is achieved via plain text file.
- Keyboard navigation: Hall full control with keyboard navigation.
- Minimalistic: no window decorations or nonsense icons floating around. But you can fully customize it.
- Window management: is left to the user. Windows are held inside containers, which can be split veritically or horizontally. They can also optionally be resized. There are also options for stacking the windows, as well as tabbing them.
- Floating pop-up windows.
- Want more, check this.
Minimal I3 setup
Operating System
- Ubuntu 20.04 (Desktop/Server), download the installer and install Ubuntu by walking through installer.
- If you choose Ubuntu Server, you’ll need a display server so let’s install X Window System (Xorg).
sudo apt install xinit
# The configuration files are stored in /etc/X11/xinit
# You can override it by creating and modifying ~/.xinitrc
Install I3
- You can install i3 from Ubuntu repository. It includes the window manager, a screen locker and two programs which write a status line to i3bar through stdout.
Note that, i3-wm conflicts with i3-gaps (a fork of i3 with gaps and other features).
sudo apt install i3
- Or build from source, I have a personal fork - Rounded i3-gaps.
# Dependencies
sudo apt install git libxcb1-dev libxcb-keysyms1-dev libpango1.0-dev \
    libxcb-util0-dev libxcb-icccm4-dev libyajl-dev \
    libstartup-notification0-dev libxcb-randr0-dev \
    libev-dev libxcb-cursor-dev libxcb-xinerama0-dev \
    libxcb-xkb-dev libxkbcommon-dev libxkbcommon-x11-dev \
    autoconf libxcb-xrm0 libxcb-xrm-dev automake i3status \
    ninja-build meson libxcb-shape0-dev build-essential -y
git clone https://github.com/ntk148v/i3.git
cd i3/
# Compile
mkdir -p build && cd build
meson ..
ninja
sudo ninja install
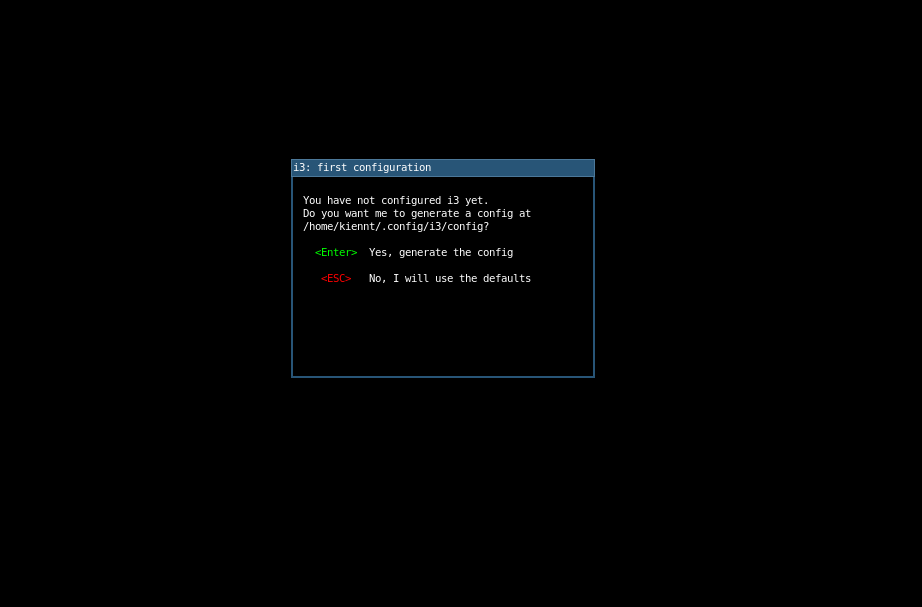
Reboot. After reboot, choose i3 as your WM/DE.
A prompt will be shown to create a config file, just hit
<Enter>.
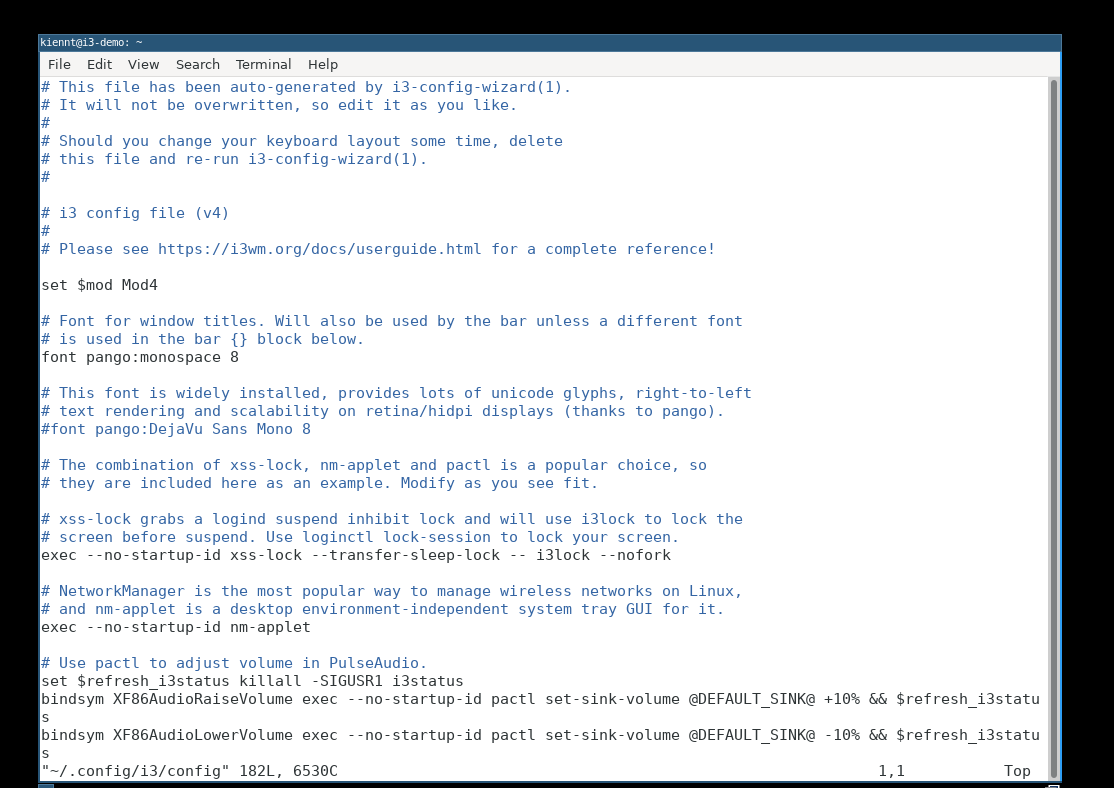
<mod>key isWindownow. Hit<mod>+Enterto start terminal emulator.We have i3 first setup here with the default configuration. As mentioned before, configuration is achieved via plain text file.
Usage
This post doesn’t aim to cover everything about i3, see the official documentation for more information.
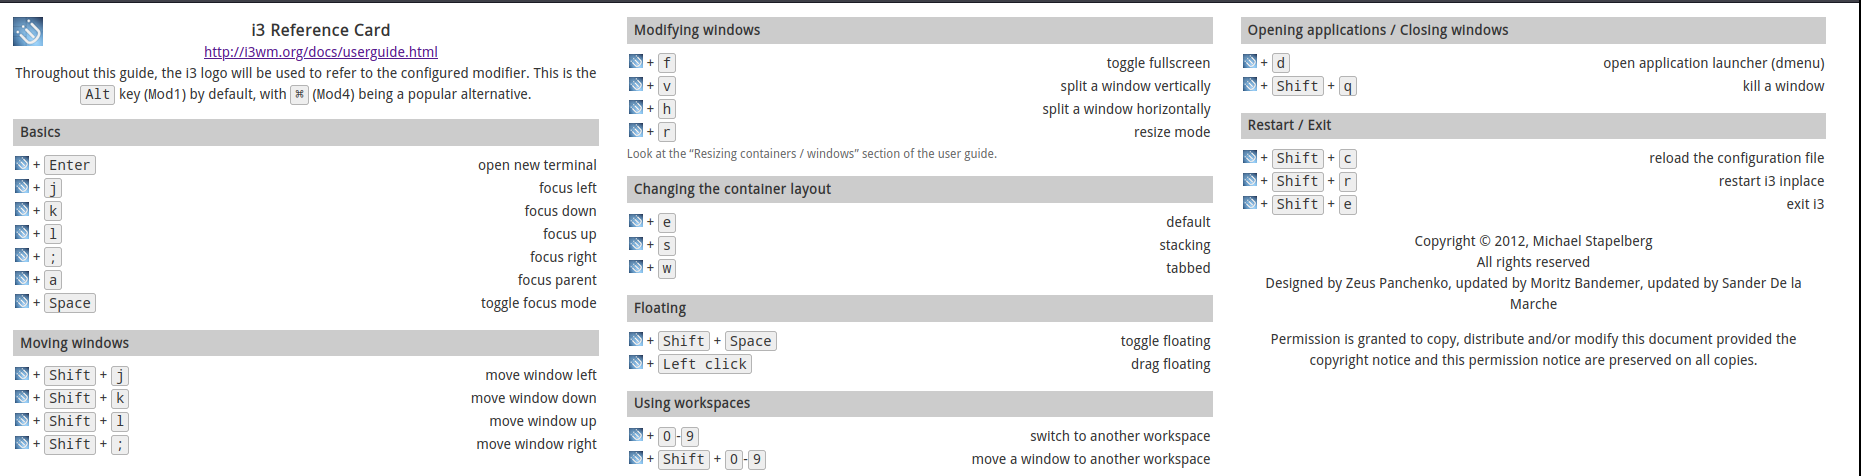
Keybindings
- In i3, commands are invoked with a modifier key, referred to as
$mod. This isAlt (Mod1)by default, withSuper (Mod4)being a popular alternative. Super is the key usually represented on a keyboard as a Windows icon, or on an Apple keyboard as a Command key. - See i3 reference card and Using i3 for defaults.
Workspace, Container and Window
- In i3, workspace is simply the equivalent of a virtual desktop. You can have as many workspaces as you want.
- i3 manages windows in a tree structure, with containers as building blocks.
- A container contains one or multiple windows. Its windows will be positioned depending on the container’s layout.
- There are 3 different layouts possible:
- Split: Each window share the container space and are split horizontally (splith) or vertically (splitv). This is the default layout.
- Stacked - The focused window is visible and the other ones are stacked behind. You can change the window’s focus via keystrokes easily. You have access to the list of windows open too, at the top of the container itself.
- Tabbed - This layout is similar as the stacked layout, except that the windows’ list is vertically split, and not horizontally.
- A window, where an application is running, can be created in a container. It will automatically position itself and be in focus, depending on the container’s layout. You can move them around or even change the layout of the container using keystrokes.
- There are two different sorts of windows: fixed windows (by default) and floating windows.
Application launcher
- i3 uses dmenu as an application launcher, which is bound by default to
$mod+d. - rofi is a popular dmenu replacement and more that can list dekstop entries.
Configuration
- You can use my minimal configuration. It requires some extra packages.
sudo apt install hsetroot rofi compton -y
Details
Cheat sheat shortcut
| Shortcut | Description |
|---|---|
| $mod + Enter | Open a terminal |
| $mod + d | Open application launcher |
| $mod + c | Kill focused window |
| $mod + right/left/up/down | Change focus |
| $mod + Shift + right/left/up/down | Move focused window in direction |
| $mod + 1/2/3… | Switch workspace |
| $mod + Shift + 1/2/3… | Move focused window to the specified workspace |
| $mod + space | Change between focus and floating mode |
| $mod + Shift + r | Restart i3 |
| $mod + Shift + c | Reload config i3 |
| $mod + q | Quit i3 |
Minimal configuration file
# i3 config file
# Please see https://i3wm.org/docs/userguide.html for a complete reference!

# Set modifier
set $mod Mod4
set $alt Mod1

default_orientation auto

# Font for window titles.
font pango:DejaVu Sans Mono 0

# Use Mouse+$mod to drag floating windows to their wanted position
floating_modifier $mod

# Here is the trick to disable titlebar completely
for_window [class="^.*"] border pixel 0

# Autostart
exec --no-startup-id hsetroot -solid "#F1CCBB"
exec --no-startup-id xsettingsd &
exec --no-startup-id compton -b
exec --no-startup-id xss-lock --transfer-sleep-lock -- i3lock --nofork
exec --no-startup-id nm-applet

# Keybindings
# start a terminal
bindsym $mod+Return exec i3-sensible-terminal
# kill focused window
bindsym $mod+c kill
bindsym $alt+F4 kill
# start rofi
bindsym $mod+Shift+d exec i3-dmenu-desktop --dmenu="dmenu -i -fn 'DejaVu Sans:size=8'"
bindsym $mod+d exec rofi -lines 12 -padding 18 -width 60 -location 0 -show drun -sidebar-mode -columns 3 -font 'DejaVu Sans 8'
# Use pactl to adjust volume in PulseAudio.
set $refresh_i3status killall -SIGUSR1 i3status
bindsym XF86AudioRaiseVolume exec --no-startup-id pactl set-sink-volume @DEFAULT_SINK@ +10% && $refresh_i3status
bindsym XF86AudioLowerVolume exec --no-startup-id pactl set-sink-volume @DEFAULT_SINK@ -10% && $refresh_i3status
bindsym XF86AudioMute exec --no-startup-id pactl set-sink-mute @DEFAULT_SINK@ toggle && $refresh_i3status
bindsym XF86AudioMicMute exec --no-startup-id pactl set-source-mute @DEFAULT_SOURCE@ toggle && $refresh_i3status

# change focus
bindsym $mod+Left focus left
bindsym $mod+Down focus down
bindsym $mod+Up focus up
bindsym $mod+Right focus right

# alternatively, you can use the cursor keys:
bindsym $mod+Shift+Left move left
bindsym $mod+Shift+Down move down
bindsym $mod+Shift+Up move up
bindsym $mod+Shift+Right move right

# split in horizontal orientation
bindsym $mod+h split h

# split in vertical orientation
bindsym $mod+v split v

# enter fullscreen mode for the focused container
bindsym $mod+f fullscreen toggle

# change container layout (stacked, tabbed, toggle split)
bindsym $mod+s layout stacking
bindsym $mod+w layout tabbed
bindsym $mod+e layout toggle split

# toggle tiling / floating
bindsym $mod+Shift+space floating toggle

# change focus between tiling / floating windows
bindsym $mod+space focus mode_toggle

# focus the parent container
bindsym $mod+a focus parent

# Define names for default workspaces for which we configure key bindings later on.
# We use variables to avoid repeating the names in multiple places.
set $ws1 "1"
set $ws2 "2"
set $ws3 "3"
set $ws4 "4"
set $ws5 "5"
set $ws6 "6"
set $ws7 "7"
set $ws8 "8"
set $ws9 "9"
set $ws10 "10"

# switch to workspace
bindsym $mod+1 workspace number $ws1
bindsym $mod+2 workspace number $ws2
bindsym $mod+3 workspace number $ws3
bindsym $mod+4 workspace number $ws4
bindsym $mod+5 workspace number $ws5
bindsym $mod+6 workspace number $ws6
bindsym $mod+7 workspace number $ws7
bindsym $mod+8 workspace number $ws8
bindsym $mod+9 workspace number $ws9
bindsym $mod+0 workspace number $ws10

# move focused container to workspace
bindsym $mod+Shift+1 move container to workspace number $ws1
bindsym $mod+Shift+2 move container to workspace number $ws2
bindsym $mod+Shift+3 move container to workspace number $ws3
bindsym $mod+Shift+4 move container to workspace number $ws4
bindsym $mod+Shift+5 move container to workspace number $ws5
bindsym $mod+Shift+6 move container to workspace number $ws6
bindsym $mod+Shift+7 move container to workspace number $ws7
bindsym $mod+Shift+8 move container to workspace number $ws8
bindsym $mod+Shift+9 move container to workspace number $ws9
bindsym $mod+Shift+0 move container to workspace number $ws10

# reload the configuration file
bindsym $mod+Shift+c reload
# restart i3 inplace (preserves your layout/session, can be used to upgrade i3)
bindsym $mod+Shift+r restart
# exit i3 (logs you out of your X session)
bindsym $mod+Shift+e exec "i3-nagbar -t warning -m 'You pressed the exit shortcut. Do you really want to exit i3? This will end your X session.' -B 'Yes, exit i3' 'i3-msg exit'"

# resize window (you can also use the mouse for that)
mode "resize" {
        bindsym Left resize shrink width 5 px or 5 ppt
        bindsym Down resize grow height 5 px or 5 ppt
        bindsym Up resize shrink height 5 px or 5 ppt
        bindsym Right resize grow width 5 px or 5 ppt
        bindsym Return mode "default"
}
bindsym $mod+r mode "resize"

# panel
bar {
        colors {
        background #2f343f
        statusline #2f343f
        separator #4b5262

        # colour of border, background, and text
        focused_workspace       #2f343f #bf616a #d8dee8
        active_workspace        #2f343f #2f343f #d8dee8
        inactive_workspace      #2f343f #2f343f #d8dee8
        urgent_workspacei       #2f343f #ebcb8b #2f343f
    }
        status_command i3status
}

# gaps
gaps top    20
gaps left   10
gaps right  10
gaps bottom 10
gaps inner  25
border_radius 10

# Hide edge borders only if there is one window with no gaps
hide_edge_borders smart_no_gaps

# reload
exec_always hsetroot -solid "#F1CCBB"
Some tricks and tips
A trick with terminal emulator:
- Disable scrollbar and menubar.

- Configure padding for vte-terminal.
mkdir -p ~/.config/gtk-3.0
cat <<EOT >> ~/.config/gtk-3.0/gtk.css
vte-terminal {
    padding: 30px;
}
EOT
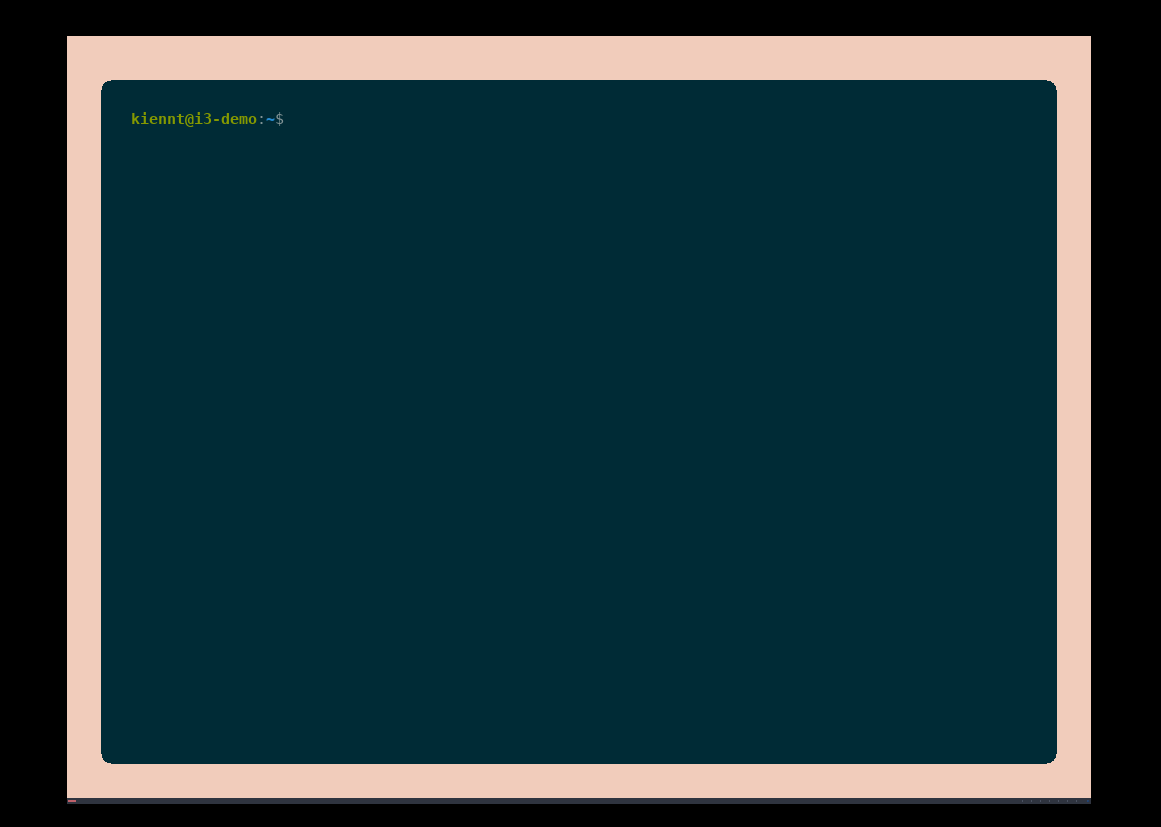
- Result.
References
- https://www.lifewire.com/window-manager-vs-the-desktop-environment-in-linux-4588338
- https://en.wikipedia.org/wiki/X_window_manager
- https://i3wm.org/docs
- https://wiki.archlinux.org/title/i3